Transport
The Transport tab is where you declare the delivery modes you support on Octopia and connect them to your real shipping operations and your PrestaShop catalog.
It does three things at once:
- Declares which Octopia delivery modes you publish with your offers (Tracked, Express, Mondial Relay, Relais Colis, Colissimo, big-parcel modes…) — these codes are sent in the
deliveryModesarray at offer integration time. - Tells Octopia which carrier to expect at shipment time for each mode (Colissimo, Chronopost, DHL Express…) — the carrier name is sent later, when you declare a shipment.
- Maps each Octopia mode to a PrestaShop carrier so incoming marketplace orders are attached to the right PrestaShop carrier on import.
Octopia reference
Delivery modes, their codes and their eligibility are defined by Octopia. For the official, always-current description, see Octopia's help article: Comment paramétrer vos modes de livraison. The module mirrors that catalogue and the per-channel availability rules described below.
Step 1 — Download the Octopia carrier list
The first time you open the Transport tab you see a warning: the Octopia carrier list has not been downloaded yet. You cannot map a shipment carrier before that.
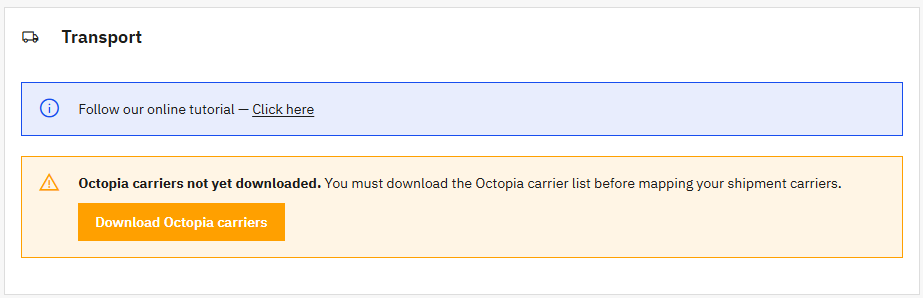
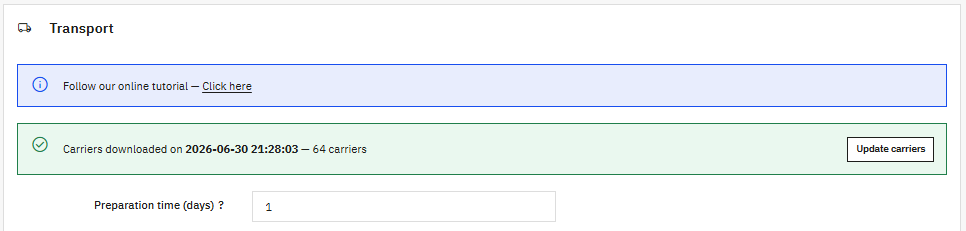
Click Download Octopia carriers. The module fetches the full list of carriers Octopia accepts (around 60 — La Poste, Chronopost, DHL Express, Mondial Relay, GLS, UPS, Colissimo…) and stores it locally. A green confirmation then shows the download date and the carrier count.
Refresh from time to time
Octopia adds and removes carriers periodically. Use the Update carriers button next to the download date to refresh the list whenever you need.
Step 2 — Set the default preparation time
Right above the mapping table, a single Preparation time (days) field sets the default applied to every delivery mode. It is the time Octopia announces to customers between the order date and the shipping date — 1 means "shipped the next working day".
This is only the global baseline: you can override it later per profile (in the Profiles tab) or per product (in Products & Offers → Product overrides).
Stay realistic
A too-low preparation time exposes you to SLA penalties on Octopia (the deadline compliance indicator drops). Use a value you can honour every day, even in busy periods.
Step 3 — Read the mode list: families and badges
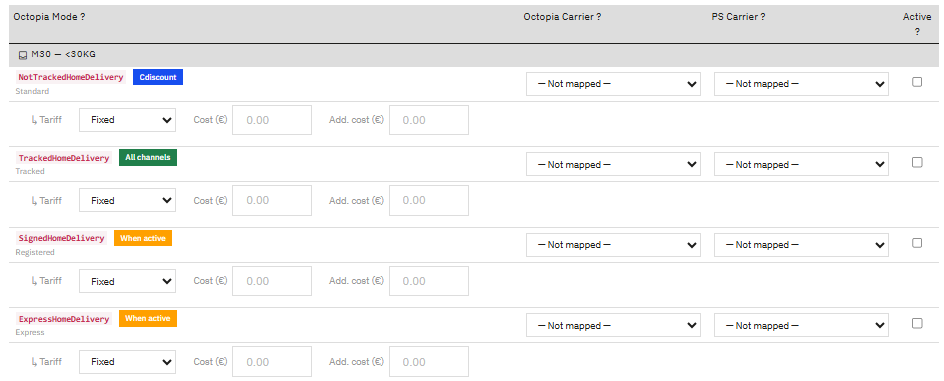
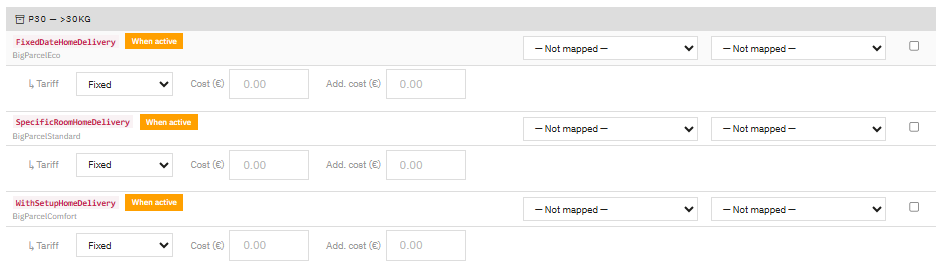
Once your carriers are downloaded, the full table appears, grouped into four families:
| Family | Octopia modes (code · sub-label) |
|---|---|
| M30 — parcels under 30 kg | NotTrackedHomeDelivery · Standard · TrackedHomeDelivery · Tracked · SignedHomeDelivery · Registered · ExpressHomeDelivery · Express |
| P30 — parcels over 30 kg | FixedDateHomeDelivery · BigParcelEco · SpecificRoomHomeDelivery · BigParcelStandard · WithSetupHomeDelivery · BigParcelComfort |
| Shop Pickup | ImmediateVendorPickup · Rim · VendorPickup · Relay |
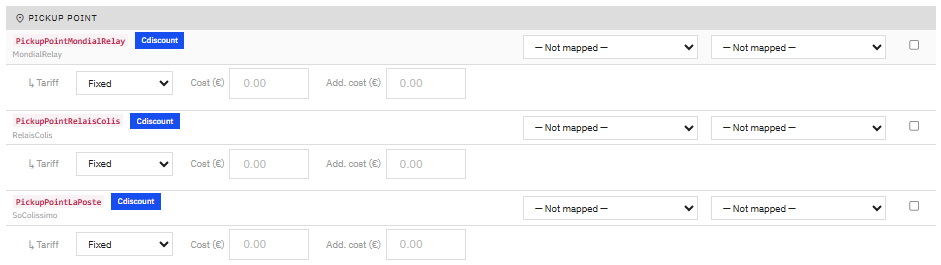
| Pickup Point | PickupPointMondialRelay · MondialRelay · PickupPointRelaisColis · RelaisColis · PickupPointLaPoste · SoColissimo |

Availability badges
Next to each mode, a colored badge tells you where the mode applies. These come straight from Octopia's specifications — they are informational and not editable.
- All channels (green) — the mode is mandatory on every channel. Today this is Tracked (
TrackedHomeDelivery). - Cdiscount (blue) — the mode applies to Cdiscount France (
CDISFR) only. - When active (orange) — the mode is available only if you have enabled it in your Octopia seller settings, on the Octopia platform itself (not in this module).
- Fulfillment (purple) — a Fulfillment-by-Cdiscount mode: Octopia/Cdiscount handle the logistics, not you (see below).
The exact eligibility of each mode depends on your Octopia subscription; refer to the Octopia help article for the authoritative list.
Fulfillment modes are read-only
At the end of the Pickup Point family you will find a block of Fulfillment modes (ExpressPickupPointMondialRelay, ExpressLockerMondialRelay, ExpressPickupPointRelaisColis, PickupPointChronopostLock, ExpressPickupPointCdiscount, StandardPickupPointLaPoste, ExpressPickupPointLaPoste).
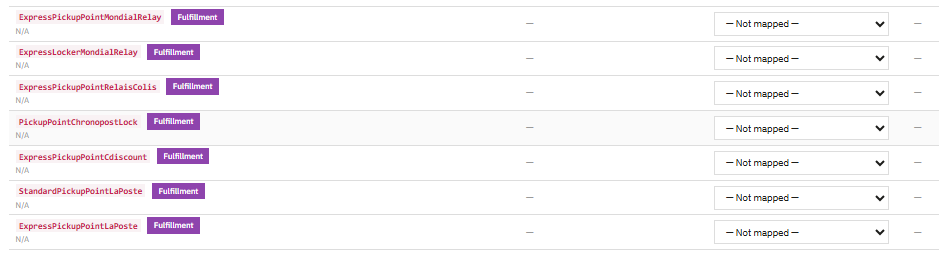
Because Octopia ships these for you, the row is mostly read-only:
- Octopia Carrier shows
—— you never declare a shipment for them. - Active shows
—— they are not part of your offer submissions, and there is no tariff to set. - PS Carrier remains editable — map it so that, if such an order is imported, it is still attached to a sensible PrestaShop carrier in your back-office.
Step 4 — Map a mode
For every non-Fulfillment mode you fill the columns below, then a Tariff sub-row.
| Column | What it means (from the in-module tooltips) |
|---|---|
| Octopia Mode | The Octopia delivery mode code used in the API (e.g. THD, EHD). Sent in the deliveryModes array when publishing offers. |
| Octopia Carrier | The carrier name sent to Octopia when declaring a shipment for orders using this mode (e.g. Colissimo, Chronopost, DHL Express). |
| PS Carrier | The PrestaShop carrier that corresponds to this Octopia mode. Used to match incoming orders to the right carrier on import. |
| Active | Enables the mode so it is included in your offer submissions. Only active modes are sent to Octopia. |
When is each value used?
- Octopia Mode + Tariff are sent at offer publication time (so Octopia knows which shipping options apply and how much they cost).
- Octopia Carrier is sent later, at shipment time (so Octopia knows which carrier you actually used).
- PS Carrier is used at order import time (to attach the incoming order to the right PrestaShop carrier).
The Tariff sub-row
Under each active mode, the Tariff selector controls how the shipping price for that mode is sent to Octopia:
- Fixed — you enter a flat Cost (€) and an Add. cost (€) applied per extra unit ordered. These exact values are sent to Octopia.
- PS calculation — the cost is derived from your PrestaShop carrier configuration, with Min cost (€) and Min add. (€) acting as a floor (the value sent is never below them).
This Transport-tab tariff is the global baseline. You can refine it:
- per profile — in the Profiles tab, each profile can override the cost of any mode for the products it covers;
- per product — in Products & Offers → Product overrides, where a single product can carry its own shipping cost for a given mode.
Tracking number and tracking link
Two related points govern what you must provide when the shipment is declared:
-
A tracking number is mandatory for "tracked" modes. Every mode except Standard (
NotTrackedHomeDelivery) and the two Shop Pickup modes (Rim, Relay) requires a parcel number — i.e. Tracked, Registered, Express, every big-parcel mode and every pickup-point mode. The module reads it from the order's shipping information (the tracking number you enter in PrestaShop, or that Boxtal / your ERP writes). Until it is filled in, the shipment cannot be declared: Octopia rejects a parcel with no number, so the module simply retries on the next pass. Untracked modes can be declared shipped with the carrier name alone. -
The tracking link is built from your PrestaShop carrier URL. The clickable tracking link the module forwards to Octopia (so the buyer can follow the parcel) is taken from the PrestaShop carrier's tracking URL, set in Shipping → Carriers → [your carrier] → Tracking URL. Use the native PrestaShop placeholder
@where the tracking number goes (e.g.https://www.laposte.fr/outils/suivre-vos-envois?code=@). If that field is empty — or has no@— the shipment still goes through with its parcel number, but no tracking link is sent. So configure it on every PrestaShop carrier you map here.
Step 5 — Save
Click Save at the bottom of the table. The module persists the carrier mapping, the preparation time, the tariffs and the activation state of every mode. The page reloads with a green Settings saved. banner, and your mapping is live: future product synchronisations and order imports use it.
Deactivating a mode wipes its overrides
If you uncheck Active on a mode that already has profile or product overrides, the module asks you to confirm. On confirmation, those overrides are permanently deleted. The mode itself is kept (you can reactivate it later), but its overrides are not — this is intentional, to avoid silently leaking shipping data to Octopia for a mode you thought was disabled.
Activating new modes later
You don't have to map every mode on day one. Most sellers start with Tracked (mandatory anyway), add one or two pickup-point providers, and enable big-parcel modes only if they sell heavy items. Come back anytime, activate a mode, fill its mapping and Save — activating a mode is purely additive and touches no existing override.
Multi-account behavior
The carrier list and the whole mapping are scoped per Octopia account. Switching account via the dropdown at the top of the page swaps the entire Transport configuration: each account has its own carriers, preparation time and mode mapping, with no conflict between accounts.
Next step
Your delivery modes are ready. The next step is to define Profiles — rule sets that bundle a model with pricing rules, condition mapping, eco-taxes and per-mode shipping overrides.
Profiles — create your first profile.