Models
Before Octopia Sync can publish a single product, it needs to know which Octopia category that product belongs to and what information that category demands. A model is how you answer that, once, for a whole family of products.
A model is a reusable template that ties a group of your products to one Octopia level-3 category and describes how to fill every field that category requires. You build one model per Octopia category you sell in — sell smartphones and headphones and you'll have a Smartphones model and a Headphones model, each with its own required properties.
Models sit at the base of the whole configuration: profiles point to a model, and your offers are published to Octopia through the model's category. Get your models right and the rest falls into place.
Step 1 — Download the Octopia category tree
The first time you open Models, the module has no category data yet, so it stops you: Octopia categories not yet downloaded — you must download the Octopia category tree before creating models.
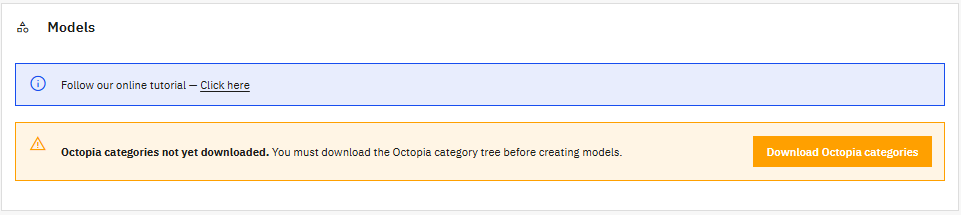
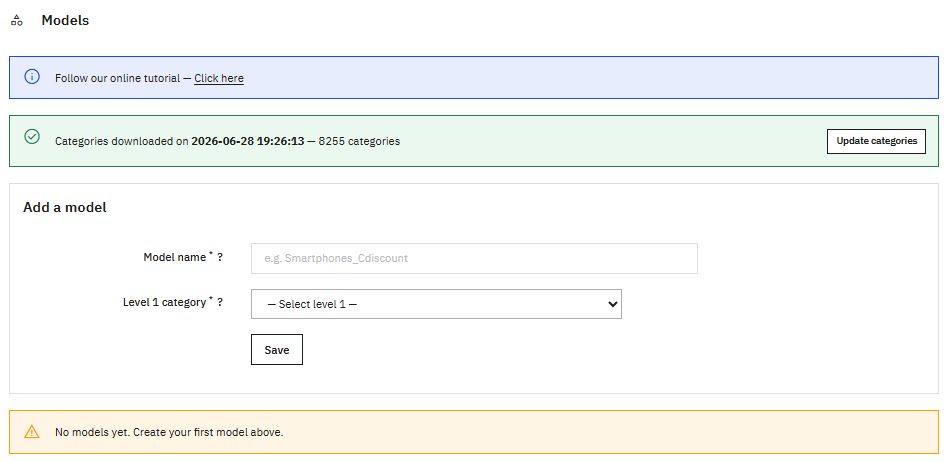
Click Download Octopia categories. The module pulls Octopia's entire catalogue structure — over 8,000 categories across three levels — and stores it locally so the rest of the screen stays instant. It takes a few seconds, after which a green banner confirms the date and the exact count.
Refresh now and then
Octopia keeps changing its catalogue. Once your download is over a month old, the green banner turns orange — Your Octopia categories are more than 1 month old — with an Update categories button. Running it occasionally keeps your models aligned with Octopia's current structure, and it never disturbs the models you've already saved.
Step 2 — Create a model
With the tree in place, the Add a model form is ready. You start with a name and a category.
Model name — a label for your own eyes only; Octopia never sees it. Make it descriptive of the products it targets, like Smartphones_Cdiscount, so you recognise it later in profiles and tables.
Level 1 → Level 2 → Level 3 — Octopia's catalogue is a strict three-level hierarchy, and you pick it in cascade: choosing a Level 1 reveals the Level 2 list, and Level 2 reveals Level 3. Level 3 is the one that matters most — it's the precise category Octopia uses to publish your products, and it dictates exactly which properties you'll have to fill. A pair of wireless earbuds, for instance, might land on Audio → Headphones → Wireless headphones.
Once Level 3 is set, one or two badges may light up next to the form:
- Brand mandatory — every product in this category must carry a brand.
- Variant category — the category accepts variants (colour, size, capacity…).
These come straight from Octopia's definition of the category. You can't toggle them — they describe what the category expects, so you know what to prepare on the PrestaShop side.
Step 3 — Map the specific fields
Selecting Level 3 unfolds a Specific data section listing every property that category supports, with a reminder: map each Octopia field to a value, an attribute or a feature; only filled fields are sent. Each row is one Octopia property, and you decide where its value comes from when a product is pushed.
| Column | What it is |
|---|---|
| Specific field | The property Octopia expects — Color(s), Shoe size, Heel type… |
| Necessity | How Octopia rates it: Mandatory, Recommended or Optional |
| Source | Where the value will be read from (the four types below) |
| Value | The fixed value, or the attribute / feature / Octopia choice to use |
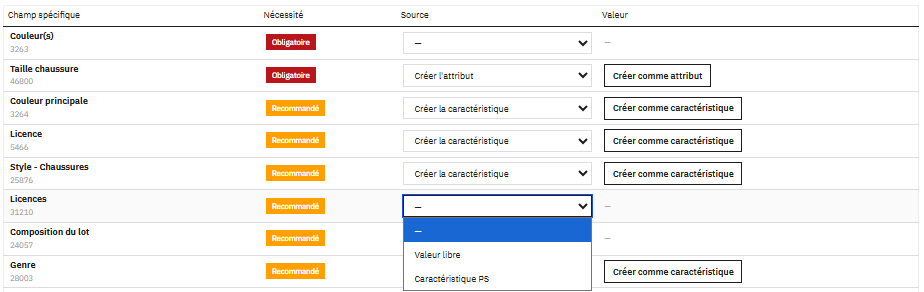
The four source types:
- Free value — you type a fixed text once and every product sends it as-is (e.g. Made in France). Simple, but raw: if the text doesn't match what Octopia expects, the product can be rejected.
- PS Attribute — the value is read from a PrestaShop attribute (variant-level data such as colour or size), so it can differ for each combination.
- PS Feature — the value is read from a PrestaShop feature (catalogue-level data such as material or weight), the same for every combination.
- Octopia value (predefined list) — some properties enforce a list of values Octopia itself approves (e.g. Gender, Main colour, Sub-condition, Country of origin). These fields are not filled by hand: they use the Create / Use existing mechanism described in the next step, so only a value Octopia recognises is ever sent.
The Source list depends on the Necessity
Octopia Sync filters the Source dropdown by how Octopia rates the field:
- Mandatory → PS Attribute only (Free value, PS Feature and Octopia value are hidden).
- Recommended / Optional → Free value, PS Feature or Octopia value (PS Attribute is hidden here).
The reason is variants. Mandatory properties are almost always what separates one variant from another (the colour or the size on a clothing category). A single static value would push every variant with the same value, which clashes with how Octopia builds variant families — so a Mandatory field must read from an attribute, which varies per combination. Recommended and optional fields aren't variant-discriminating, so an attribute isn't offered there.
Missing a Mandatory attribute? Create one in Catalog → Attributes & Features, assign it to your products, then come back.
Fill the mandatory ones first
Recommended and optional rows can stay empty — only the rows you actually fill are sent. Cover the mandatory fields to get publishing, then enrich the rest later for a richer listing.
Fields with predefined values: Create or Use existing
When a property carries an Octopia value list (e.g. Gender, Sub-condition, Country of origin), the Source column no longer shows a plain choice but a mode selector you can change at any time — even after saving, even after creating:
1. Create the feature / attribute (default)
Octopia Sync creates, inside PrestaShop, a feature (or an attribute if the field is mandatory) already filled with every Octopia value. You type nothing: the values are exactly the ones Octopia expects.
- The "Create as feature / as attribute" button in the Value column performs the creation.
- Once created, the Source column shows "Created on \<date>" and the Value shows the created object.
- The value turns green once the model is saved: that's the signal it will actually be used when publishing.
- All that's left is to set the right value on each product, in Catalog → Products (Features or Combinations tab). Ideal when starting from scratch.
2. Use an existing feature / attribute
You reuse a feature/attribute you have already created and filled on your products — nothing is recreated. The Value column then shows the list of your existing objects; pick yours. Ideal for a large catalog already populated: no need to re-fill thousands of products.
Use existing → Mappings tab
Your values (e.g. Used) may not match Octopia's (e.g. Good condition). After saving the model, open the Mappings tab: each PrestaShop value is paired with an Octopia value. At export the product's value is translated automatically; a value with no correspondence sends nothing. The correspondence is stored by ID — renaming a value in PrestaShop never breaks it.
Changing your mind
The selector always stays editable. Switch from Create to Use existing (or back) and the Value column updates immediately. An object already created in PrestaShop is not deleted automatically: if you no longer want it, delete it yourself in Catalog → Attributes & Features (the module then cleans up the link on its own).
Step 4 — Save
Click Save. The module checks three things: the name is unique for this account, a Level 3 category is selected, and every mandatory field has a source and a value. Miss a mandatory field and the save is refused with a list of exactly what's missing — mandatory rows are blocking by design. When it's clean, you get Model saved.

Saved models
Your models for the current account are listed at the bottom of the page:
| Column | Description |
|---|---|
| Model name | The name you chose |
| Level 1 / 2 / 3 | The category path, with Level 3 also showing Octopia's reference code |
| Brand | Yes if the category requires a brand, otherwise No |
| Variant | Yes if the category accepts variants, otherwise No |
| Actions | Edit to reopen the model, Delete to remove it |
Edit reloads the whole model into the form — name, the three levels, the badges and every Specific data row — so you can adjust and save again.
Delete asks for confirmation, then protects you: if any profile still points to the model, the deletion is refused with This model cannot be deleted because it is used by N profile(s). Reassign or remove those profiles first (in the Profiles tab), and the model becomes deletable. Deleting a model only touches Octopia Sync — your PrestaShop products are never affected.
One set of models per account
Models belong to the active account. Switch account with the dropdown at the top and the whole tab reloads with that account's models — two accounts can even use the same model name without clashing. The same isolation applies to every other tab, so nothing leaks between accounts.
Exception: created features/attributes are shared
A feature or attribute created via the Create mode is a PrestaShop object, not an account object. It is therefore detached from the account: created once, it is reusable by all your Octopia accounts. In practice, if another account maps the same field to Create, the module reuses the already-created object instead of making a new one. The same goes for value correspondences (Mappings tab): they are global, shared across accounts.
Next step
Mappings — match your PrestaShop values to Octopia values for reused features/attributes.
Transport — match Octopia's delivery modes to your PrestaShop carriers and shipping costs.